Blog

  • Freshman Year as an ANFX Student

    Freshman Year as an ANFX Student

    Starting freshman year in Drexel’s Animation & Visual Effects (ANFX) program is an exciting step into the world of digital storytelling, animation, and motion graphics. This first year is all about learning the fundamentals, exploring different animation techniques, and getting hands-on experience with industry-standard tools. Whether you’re interested in 2D animation, 3D modeling, or VFX, freshman year sets the foundation for a creative and technical journey ahead.

    Freshman-year coursework introduces students to essential animation principles and software while also incorporating general art and design fundamentals. Freshman year provides the foundation for future courses in character animation, visual effects, and advanced 3D modeling. Sophomore year will bring more complex projects, deeper exploration of animation techniques, and opportunities to specialize in different areas of ANFX.

    Core Classes

    Freshman-year coursework introduces students to essential animation principles and software while also incorporating general art and design fundamentals. Key classes include:

    • Digital Imaging for Animation & VFX (ANIM110): Covers image acquisition, lighting, and processing techniques used in the animation and VFX fields.
    • Computer Graphics Imagery (ANIM140): Focuses on representing 3D objects and spaces in 2D using both traditional drawing and digital tools—foundational for 3D modeling and animation.
    • History of Animation (ANIM215): Explores the evolution of animation from early techniques to modern digital approaches in both 2D and 3D.
    • Animation (ANIM211): Introduces concepts of 3D animation, narrative structure, storyboarding, and the creation of short animations in timeline-based software.

    Skills You’ll Learn

    • Animation Principles: Movement, timing, and weight for lifelike motion
    • 2D & 3D Design: Digital painting, character creation, and environments
    • Basic Rigging & Modeling: Creating and prepping characters for animation
    • Storyboarding & Visual Storytelling: Sketch-based planning and narrative development

    Projects & Challenges

    Freshman-year projects focus on applying learned techniques through short animation exercises. Typical assignments include:

    • Bouncing Ball Animation: A classic exercise to master timing and squash & stretch principles
    • Walk Cycle Animation: Bringing a character to life through realistic movement
    • 3D Object Modeling: Creating simple models like a chair or vehicle to practice form and texturing
    • Storyboard Sequence: Planning visual narratives through a short illustrated sequence

    One of the biggest challenges for ANFX students is adapting to the technical side of animation. Learning new software and troubleshooting can be daunting, but persistence and practice pay off.

    Tips for Success:

    • Draw frequently—even if you work digitally. Strong drawing skills help across all animation forms.
    • Master key software tools like Photoshop, Maya, and After Effects.
    • Observe real-life movement. Study how people and objects move to create believable animation.
    • Experiment with storytelling. Great animation is rooted in compelling narratives.
  • SIGGRAPH 2026 Conference Chair Chris Redmann

    ACM SIGGRAPH has announced Chris Redmann as the SIGGRAPH 2026 Conference Chair. As a familiar face across SIGGRAPH conferences, Redmann brings extensive experience having chaired several programs and…

    ACM SIGGRAPH has announced Chris Redmann as the SIGGRAPH 2026 Conference Chair. As a familiar face across SIGGRAPH conferences, Redmann brings extensive experience having chaired several programs and contributed his own work over the years. His appointment marks another milestone in a journey of leadership within the computer graphics community.

    An Experienced Voice in the SIGGRAPH Community

    Redmann’s voice is well-known to the SIGGRAPH community through his hosting of multiple episodes of SIGGRAPH Spotlight, including discussions on multiperson immersive experiences and building the open metaverse. His expertise extends beyond hosting – as SIGGRAPH 2020 Immersive Pavilion Chair and General Submissions Chair for both SIGGRAPH 2021 and 2022, he has played a crucial role in curating some of the conference’s most innovative programming.

    A Track Record of Innovation

    Throughout his tenure with SIGGRAPH, Redmann has contributed to groundbreaking initiatives across various domains. His program highlights include pioneering work in virtual production, specifically addressing challenges like standardizing color on LED walls, and innovative projects such as ESPN’s immersive VR batting cage. He has also championed important historical and environmental projects, including a VR experience focused on environmental awareness and a detailed exploration of the Tulsa Race Massacre.

    SIGGRAPH 2026 will mark the conference’s return to Los Angeles, taking place from July 19-23, 2026. Before then, the SIGGRAPH community can look forward to SIGGRAPH 2024 in Denver under Conference Chair Andres Burbano (July 28-August 1) and SIGGRAPH 2025 in Vancouver led by Ginger Alford (August 10-14).

    For more information about SIGGRAPH conferences and opportunities to get involved, visit siggraph.org.

  • Inspiration, Innovation, and Ice Cream

    We are thrilled to announce that Kristy Pron, an accomplished alumna of Drexel’s Digital Media program, has been appointed the Conference Chair for SIGGRAPH 2027. This prestigious appointment marks her second…

    We are thrilled to announce that Kristy Pron, an accomplished alumna of Drexel’s Digital Media program, has been appointed the Conference Chair for SIGGRAPH 2027. This prestigious appointment marks her second time leading the world’s premier conference on computer graphics and interactive techniques, following her groundbreaking leadership of SIGGRAPH’s first-ever virtual conference in 2020.

    From Drexel to Disney: A Digital Media Success Story

    Currently serving as a Walt Disney Imagineer, Pron leads the media arts and pipeline team responsible for pre-visualizing attractions across Disney’s global theme parks. Her team creates real-time visualizations that enable creative iteration and show reviews before physical construction begins, showcasing the innovative intersection of technology and storytelling that defines modern digital media.

    Vision for SIGGRAPH 2027

    “Computer graphics is involved in practically every industry from film and games to theme parks, automotive, medical, and beyond,” Pron shared in her vision for SIGGRAPH 2027. “I want to foster connections between attendees in different communities to inspire collaboration and ingenuity in design and production.”

    The conference will take place in Anaheim, California, from August 8 to 12, 2027, bringing together thousands of professionals, researchers, and artists from around the world. With Pron at the helm, SIGGRAPH 2027 promises to showcase the endless possibilities that emerge when innovation meets imagination.

    A Legacy of Leadership

    Pron’s journey with SIGGRAPH began as a student when she first participated as a Student Volunteer. This experience launched a remarkable trajectory that has included roles as program chair, conference chair, and special projects chair. Her story exemplifies the opportunities available to Digital Media students who pursue their passions at the intersection of technology and creativity.

    Join us in congratulating Kristy on this exceptional achievement. Her continued success and leadership in computer graphics and interactive techniques inspire current and future Digital Media students at Drexel University.

    For more information about SIGGRAPH 2027 and opportunities to get involved, visit siggraph.org.

  • Slime Rancher Zodiac

    IDM231: Scripting for Interactive Digital Media I

    By Amy Au – 2024

  • Arduynthisizer: A Digital Arduino Piano

    IDM382: Internet of Things by Wynn O’Donnell

    Overview

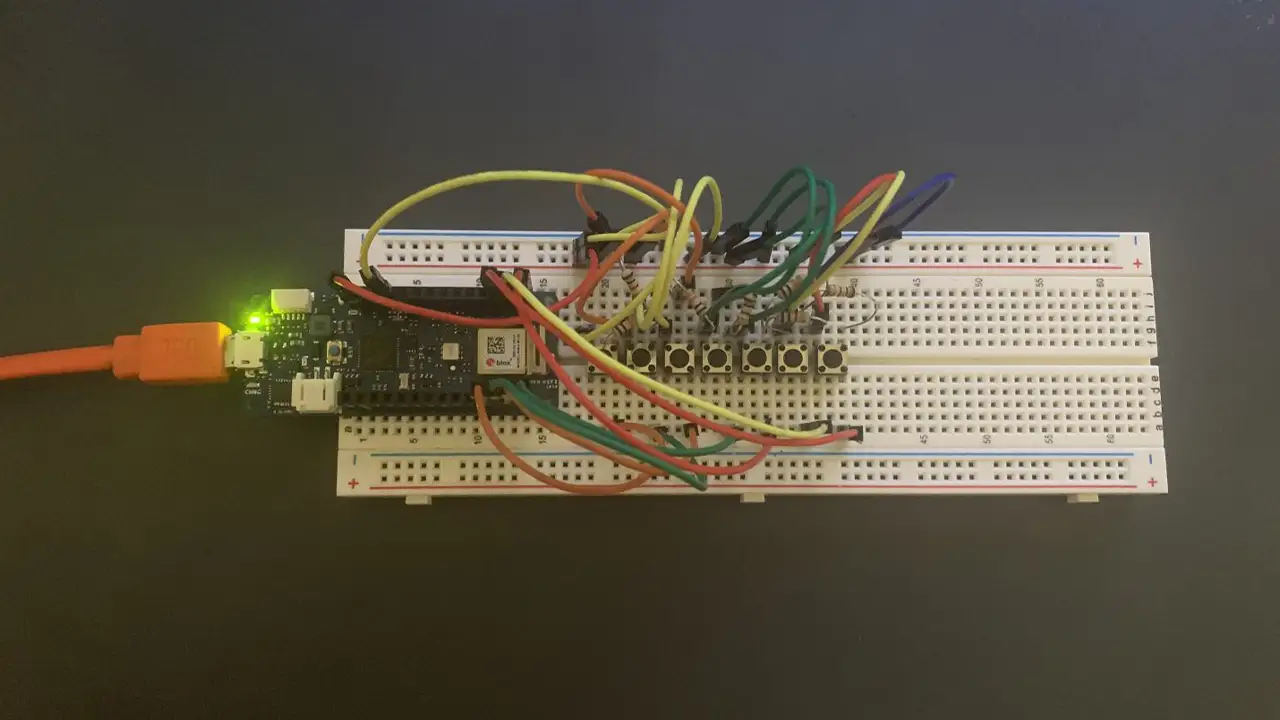
    For this project, I worked on developing an Arduino Piano with sound that can be modified and played through a browser. I called the original product in West107 the Arduorgan, a combination of the word Arduino, and the word Organ, a large piano-like musical instrument. If I go through with that theme this project will be called the Arduynthesizer, as it is an Arduino synthesizer. The Arduynthesizer will send signals to a browser when a button is pressed on it, and the browser will produce a sound based on the settings selected in the browser. The user will control the Arduynthesizer by pressing buttons on the Arduino, and by changing settings in a browser window with sliders. These sliders will include Pitch, volume, and tone.

    Breadboard with Arduino, wires, and buttons, showing the layout of the project.

    Goals

    • Add more features to an Arduino piano I created in West107
    • Make it more like a synthesizer
    • Add variation to the sounds it can produce
    • Make the sound to be able to be controlled and heard from a browser window

    Final Presentation

    Sample Code

                /* 
                  #include "thingProperties.h"
    
                  const int buttonPin1 = 2;
                  const int buttonPin2 = 3;
                  const int buttonPin3 = 4;
                  const int buttonPin4 = 5;
                  const int buttonPin5 = 6;
                  const int buttonPin6 = 7;
                  const int buttonPin7 = 8;// the number of the pushbutton pin
                  const int ledPin =  13;      // the number of the LED pin
                  int buttonState1 = 0;
                  int buttonState2 = 0;
                  int buttonState3 = 0;
                  int buttonState4 = 0;
                  int buttonState5 = 0;
                  int buttonState6 = 0;
                  int buttonState7 = 0;
                  
                  String buttonpressStr1 = "Play C Note";
                  String buttonpressStr2 = "Play D Note";
                  String buttonpressStr3 = "Play E Note";
                  String buttonpressStr4 = "Play F Note";
                  String buttonpressStr5 = "Play G Note";
                  String buttonpressStr6 = "Play A Note";
                  String buttonpressStr7 = "Play B Note";
                  
                  void setup() {
                    // Defined in thingProperties.h
                    initProperties();
                      // Initialize serial and wait for port to open:
                    Serial.begin(9600);
                    // This delay gives the chance to wait for a Serial Monitor without 
                    blocking if none is found
                    delay(1500); 
                      // initialize the LED pin as an output:
                    pinMode(ledPin, OUTPUT);
                    // initialize the pushbutton pin as an input:
                    pinMode(buttonPin1, INPUT);
                    pinMode(buttonPin2, INPUT);
                    pinMode(buttonPin3, INPUT);
                    pinMode(buttonPin4, INPUT);
                    pinMode(buttonPin5, INPUT);
                    pinMode(buttonPin6, INPUT);
                    pinMode(buttonPin7, INPUT);
                  
                    // Connect to Arduino IoT Cloud
                    ArduinoCloud.begin(ArduinoIoTPreferredConnection);
                    
                    /*
                       The following function allows you to obtain more information
                       related to the state of network and IoT Cloud connection and errors,
                       the higher number the more granular information you’ll get.
                       The default is 0 (only errors).
                       Maximum is 4
                   */
                    setDebugMessageLevel(2);
                    ArduinoCloud.printDebugInfo();
                  }
                  
                  void loop() {
                    ArduinoCloud.update();
                    // Your code here 
                      buttonState1 = digitalRead(buttonPin1);
                      buttonState2 = digitalRead(buttonPin2);
                      buttonState3 = digitalRead(buttonPin3);
                      buttonState4 = digitalRead(buttonPin4);
                      buttonState5 = digitalRead(buttonPin5);
                      buttonState6 = digitalRead(buttonPin6);
                      buttonState7 = digitalRead(buttonPin7);
                  
                    // check if the pushbutton is pressed. If it is, the buttonState is HIGH:
                    if (buttonState1 == HIGH) {
                      // turn LED on:
                      digitalWrite(ledPin, HIGH);
                      Serial.println("Play C Note");
                      messenger = buttonpressStr1;
                    } else {
                      // turn LED off:
                      digitalWrite(ledPin, LOW);
                    }
                      if (buttonState2 == HIGH) {
                      // turn LED on:
                      digitalWrite(ledPin, HIGH);
                      Serial.println("Play D Note");
                      messenger = buttonpressStr2;
                    } else {
                      // turn LED off:
                      digitalWrite(ledPin, LOW);
                    }
                      if (buttonState3 == HIGH) {
                      // turn LED on:
                      digitalWrite(ledPin, HIGH);
                      Serial.println("Play E Note");
                      messenger = buttonpressStr3;
                    } else {
                      // turn LED off:
                      digitalWrite(ledPin, LOW);
                    }
                      if (buttonState4 == HIGH) {
                      // turn LED on:
                      digitalWrite(ledPin, HIGH);
                      Serial.println("Play F Note");
                      messenger = buttonpressStr4;
                    } else {
                      // turn LED off:
                      digitalWrite(ledPin, LOW);
                    }
                      if (buttonState5 == HIGH) {
                      // turn LED on:
                      digitalWrite(ledPin, HIGH);
                      Serial.println("Play G Note");
                      messenger = buttonpressStr5;
                    } else {
                      // turn LED off:
                      digitalWrite(ledPin, LOW);
                    }
                      if (buttonState6 == HIGH) {
                      // turn LED on:
                      digitalWrite(ledPin, HIGH);
                      Serial.println("Play A Note");
                      messenger = buttonpressStr6;
                    } else {
                      // turn LED off:
                      digitalWrite(ledPin, LOW);
                    }
                        if (buttonState7 == HIGH) {
                      // turn LED on:
                      digitalWrite(ledPin, HIGH);
                      Serial.println("Play B Note");
                      messenger = buttonpressStr7;
                    } else {
                      // turn LED off:
                      digitalWrite(ledPin, LOW);
                    }
                  }//End loop
                  
                  
                  void onMessengerChange() {
                    // Do something
                  }
      
  • Reading Realm LED NeoPixel: Using Technology to Promote Education

    IDM382: Internet of Things by Leanne Chin

    Overview

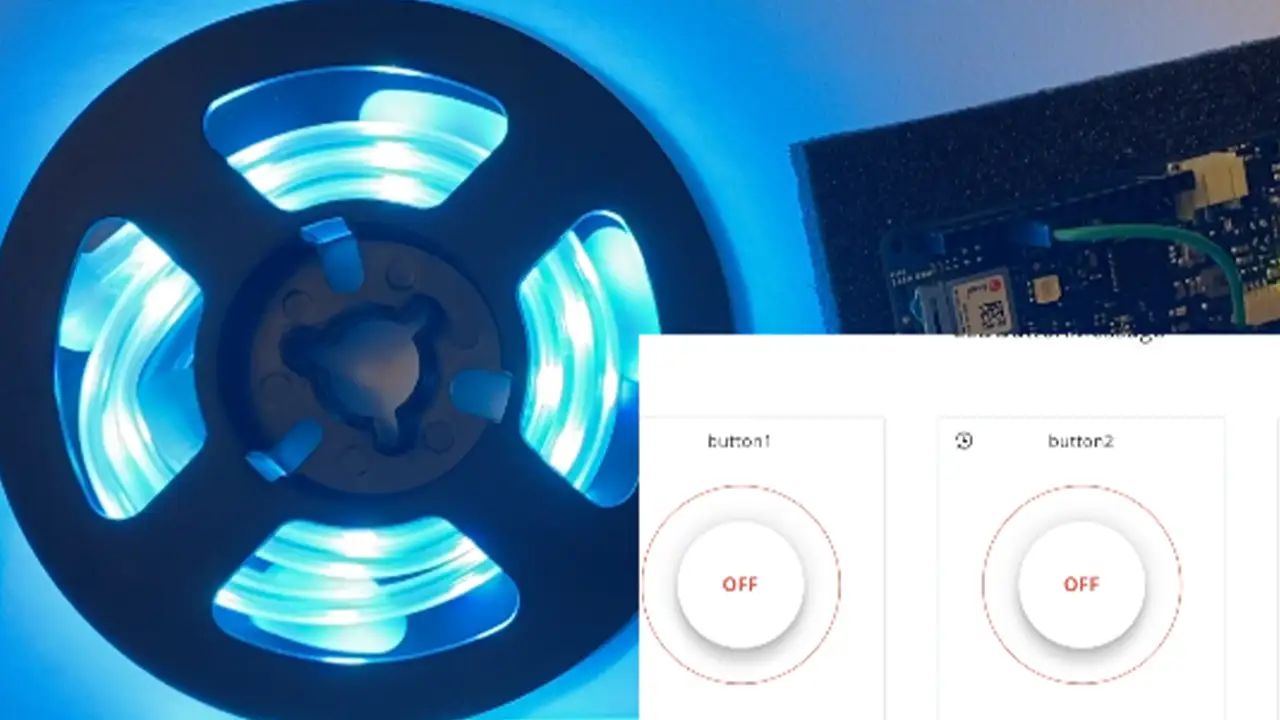
    Over the past 11 weeks, I worked on developing a device using the Internet of Things to be able to control a series of NeoPixel lights using a web browser in order to promote the use of technology to better the fundamental developmental growth of early childhood education. Through this project, I not only learned about the educational benefits that colors bring to a child’s education but also the process of understanding how to wire breadboards and work with Arduino without short-circuiting any equipment. I learned how to use a variety of different tools to reach my goal of working on my device online and how to adapt my code to each program.

    LED lights with a recording of the controller interface in the bottom right corner to turn lights on and off.

    Goals

    • Allow online access from online dashboard to control LED lights
    • Debug problem with sticky buttons
    • Debug problem where clicking onto one button

    Final Presentation

    Future Plans

    • Seeing if it is possible to attach a projector to the Arduino
    • Developing an interactive story book projector that reacts to the buttons that are pressed using IoT

    Sample Code

     
    void loop() {
        ArduinoCloud.update();
        // Your code here 
        //Serial.println("looping");
        
        for(int i=0;i<NUMPIXELS;i++){
    
          // pixels.Color takes RGB values, from 0,0,0 up to 255,255,255
          pixels.setPixelColor(i, pixels.Color(redColor, greenColor, blueColor)); 
          // Moderately bright green color.
    
          pixels.show(); // This sends the updated pixel color to the hardware.
    
          delay(delayval); // Delay for a period of time (in milliseconds).
          
          // Serial.println(i);
          
        }
        
      } // END LOOP 
    
    
      void onLEDbuttonChange() {
        // Do something
      }
    
      void onButton1Change() {
        // Do something
        
        Serial.println("virtual button click");
        
        lEDbutton = "Button Color 1 Pushed";
          
          noColor();
        
      } // End Here
    
      void onButton2Change() {
        // Do something
        
        lEDbutton = "Button Color 2 Pushed";
        
        setColor();
        
      } // End Here
    
    
      void onButton3Change() {
        // Do something
        
        lEDbutton = "Button Color 3 Pushed";
        
        setColor2();
      }
    
      void noColor() {
        redColor = 0;
        greenColor = 0;
        blueColor = 0;
      };
    
    
      void setColor(){
        redColor = 0;
        greenColor = 255;
        blueColor = 255;
        Serial.print("red: ");
        Serial.print("green: ");
        Serial.print("blue: ");
        
      };
    
      void setColor2() {
        redColor = 255;
        greenColor = 0;
        blueColor = 255;
    };
      
  • Japanese Recipe Card

    IDM241: Microinteractions

    By Kara Butler – 2022

  • Video Game Browsing

    IDM241: Microinteractions

    By Durando Angiulo – 2022

  • DEI at Drexel University

    IDM241: Microinteractions

    By Samiha Shoshi – 2022

  • Portfolio: Preeti Shenoy

    IDM222: Web Development II

    By Preeti Shenoy – 2022