IDM231: Scripting for Interactive Digital Media I
By Amy Au – 2024
IDM231: Scripting for Interactive Digital Media I
By Amy Au – 2024
IDM382: Internet of Things by Wynn O’Donnell
For this project, I worked on developing an Arduino Piano with sound that can be modified and played through a browser. I called the original product in West107 the Arduorgan, a combination of the word Arduino, and the word Organ, a large piano-like musical instrument. If I go through with that theme this project will be called the Arduynthesizer, as it is an Arduino synthesizer. The Arduynthesizer will send signals to a browser when a button is pressed on it, and the browser will produce a sound based on the settings selected in the browser. The user will control the Arduynthesizer by pressing buttons on the Arduino, and by changing settings in a browser window with sliders. These sliders will include Pitch, volume, and tone.
            /*
              #include "thingProperties.h"

              const int buttonPin1 = 2;
              const int buttonPin2 = 3;
              const int buttonPin3 = 4;
              const int buttonPin4 = 5;
              const int buttonPin5 = 6;
              const int buttonPin6 = 7;
              const int buttonPin7 = 8;// the number of the pushbutton pin
              const int ledPin =  13;      // the number of the LED pin
              int buttonState1 = 0;
              int buttonState2 = 0;
              int buttonState3 = 0;
              int buttonState4 = 0;
              int buttonState5 = 0;
              int buttonState6 = 0;
              int buttonState7 = 0;

              String buttonpressStr1 = "Play C Note";
              String buttonpressStr2 = "Play D Note";
              String buttonpressStr3 = "Play E Note";
              String buttonpressStr4 = "Play F Note";
              String buttonpressStr5 = "Play G Note";
              String buttonpressStr6 = "Play A Note";
              String buttonpressStr7 = "Play B Note";

              void setup() {
                // Defined in thingProperties.h
                initProperties();
                  // Initialize serial and wait for port to open:
                Serial.begin(9600);
                // This delay gives the chance to wait for a Serial Monitor without
                blocking if none is found
                delay(1500);
                  // initialize the LED pin as an output:
                pinMode(ledPin, OUTPUT);
                // initialize the pushbutton pin as an input:
                pinMode(buttonPin1, INPUT);
                pinMode(buttonPin2, INPUT);
                pinMode(buttonPin3, INPUT);
                pinMode(buttonPin4, INPUT);
                pinMode(buttonPin5, INPUT);
                pinMode(buttonPin6, INPUT);
                pinMode(buttonPin7, INPUT);

                // Connect to Arduino IoT Cloud
                ArduinoCloud.begin(ArduinoIoTPreferredConnection);

                /*
                   The following function allows you to obtain more information
                   related to the state of network and IoT Cloud connection and errors,
                   the higher number the more granular information you’ll get.
                   The default is 0 (only errors).
                   Maximum is 4
               */
                setDebugMessageLevel(2);
                ArduinoCloud.printDebugInfo();
              }

              void loop() {
                ArduinoCloud.update();
                // Your code here
                  buttonState1 = digitalRead(buttonPin1);
                  buttonState2 = digitalRead(buttonPin2);
                  buttonState3 = digitalRead(buttonPin3);
                  buttonState4 = digitalRead(buttonPin4);
                  buttonState5 = digitalRead(buttonPin5);
                  buttonState6 = digitalRead(buttonPin6);
                  buttonState7 = digitalRead(buttonPin7);

                // check if the pushbutton is pressed. If it is, the buttonState is HIGH:
                if (buttonState1 == HIGH) {
                  // turn LED on:
                  digitalWrite(ledPin, HIGH);
                  Serial.println("Play C Note");
                  messenger = buttonpressStr1;
                } else {
                  // turn LED off:
                  digitalWrite(ledPin, LOW);
                }
                  if (buttonState2 == HIGH) {
                  // turn LED on:
                  digitalWrite(ledPin, HIGH);
                  Serial.println("Play D Note");
                  messenger = buttonpressStr2;
                } else {
                  // turn LED off:
                  digitalWrite(ledPin, LOW);
                }
                  if (buttonState3 == HIGH) {
                  // turn LED on:
                  digitalWrite(ledPin, HIGH);
                  Serial.println("Play E Note");
                  messenger = buttonpressStr3;
                } else {
                  // turn LED off:
                  digitalWrite(ledPin, LOW);
                }
                  if (buttonState4 == HIGH) {
                  // turn LED on:
                  digitalWrite(ledPin, HIGH);
                  Serial.println("Play F Note");
                  messenger = buttonpressStr4;
                } else {
                  // turn LED off:
                  digitalWrite(ledPin, LOW);
                }
                  if (buttonState5 == HIGH) {
                  // turn LED on:
                  digitalWrite(ledPin, HIGH);
                  Serial.println("Play G Note");
                  messenger = buttonpressStr5;
                } else {
                  // turn LED off:
                  digitalWrite(ledPin, LOW);
                }
                  if (buttonState6 == HIGH) {
                  // turn LED on:
                  digitalWrite(ledPin, HIGH);
                  Serial.println("Play A Note");
                  messenger = buttonpressStr6;
                } else {
                  // turn LED off:
                  digitalWrite(ledPin, LOW);
                }
                    if (buttonState7 == HIGH) {
                  // turn LED on:
                  digitalWrite(ledPin, HIGH);
                  Serial.println("Play B Note");
                  messenger = buttonpressStr7;
                } else {
                  // turn LED off:
                  digitalWrite(ledPin, LOW);
                }
              }//End loop


              void onMessengerChange() {
                // Do something
              }
IDM382: Internet of Things by Leanne Chin
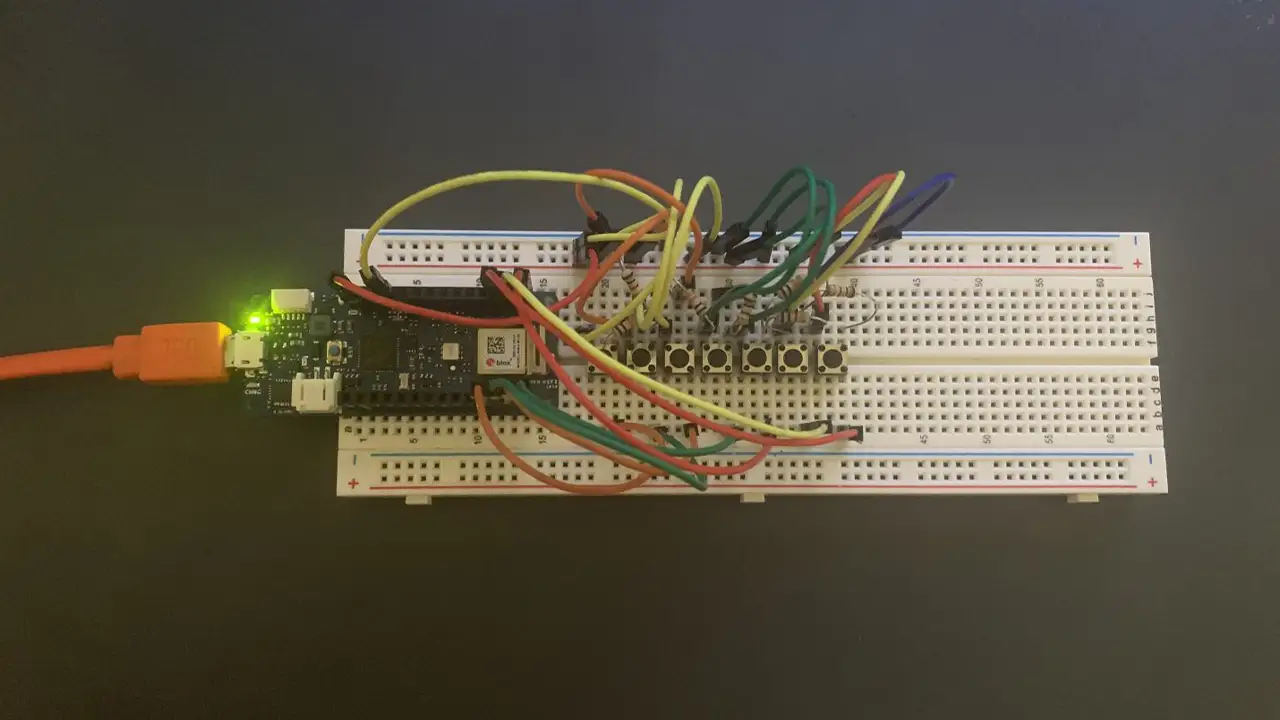
Over the past 11 weeks, I worked on developing a device using the Internet of Things to be able to control a series of NeoPixel lights using a web browser in order to promote the use of technology to better the fundamental developmental growth of early childhood education. Through this project, I not only learned about the educational benefits that colors bring to a child’s education but also the process of understanding how to wire breadboards and work with Arduino without short-circuiting any equipment. I learned how to use a variety of different tools to reach my goal of working on my device online and how to adapt my code to each program.
![]()
void loop() {
    ArduinoCloud.update();
    // Your code here
    //Serial.println("looping");

    for(int i=0;i<NUMPIXELS;i++){

      // pixels.Color takes RGB values, from 0,0,0 up to 255,255,255
      pixels.setPixelColor(i, pixels.Color(redColor, greenColor, blueColor));
      // Moderately bright green color.

      pixels.show(); // This sends the updated pixel color to the hardware.

      delay(delayval); // Delay for a period of time (in milliseconds).

      // Serial.println(i);

    }

  } // END LOOP


  void onLEDbuttonChange() {
    // Do something
  }

  void onButton1Change() {
    // Do something

    Serial.println("virtual button click");

    lEDbutton = "Button Color 1 Pushed";

      noColor();

  } // End Here

  void onButton2Change() {
    // Do something

    lEDbutton = "Button Color 2 Pushed";

    setColor();

  } // End Here


  void onButton3Change() {
    // Do something

    lEDbutton = "Button Color 3 Pushed";

    setColor2();
  }

  void noColor() {
    redColor = 0;
    greenColor = 0;
    blueColor = 0;
  };


  void setColor(){
    redColor = 0;
    greenColor = 255;
    blueColor = 255;
    Serial.print("red: ");
    Serial.print("green: ");
    Serial.print("blue: ");

  };

  void setColor2() {
    redColor = 255;
    greenColor = 0;
    blueColor = 255;
};
IDM241: Microinteractions
By Kara Butler – 2022
IDM241: Microinteractions
By Durando Angiulo – 2022
IDM241: Microinteractions
By Samiha Shoshi – 2022
IDM222: Web Development II
By Preeti Shenoy – 2022
IDM222: Web Development II
By Durando Angiulo – 2022
IDM222: Web Development II
By Alexis Raya – 2022
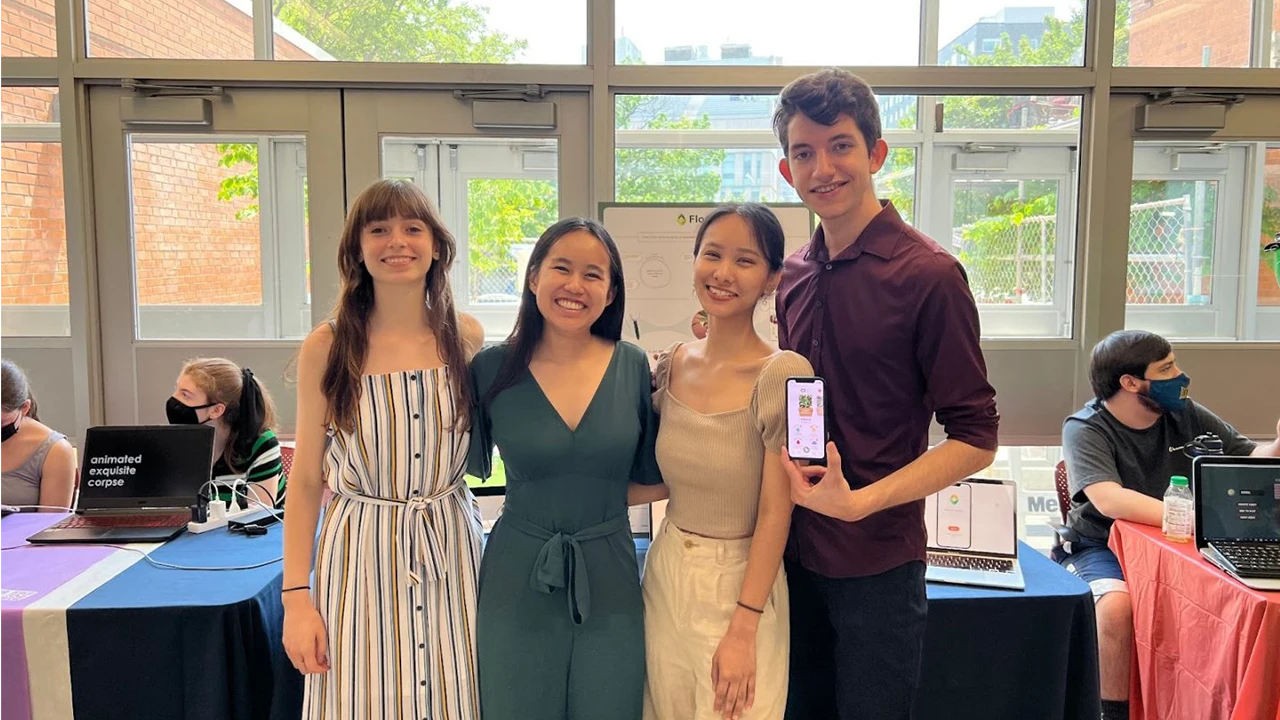
Flourish is a multimedia design concept that helps manage and care for your plants. Plant enthusiasts need guidance through tips and reminders throughout their plant care journey to feel confident and supported in providing the best care for their plants. The purpose of this project was to research, design, and develop a solution that would give plant owners a convenient method to care for their plants and provide them with the most accurate information and tools to keep their plants healthy. Our team look to collaborate our interdisciplinary skills, backgrounds, and experiences to address plant owners pain points and desires.
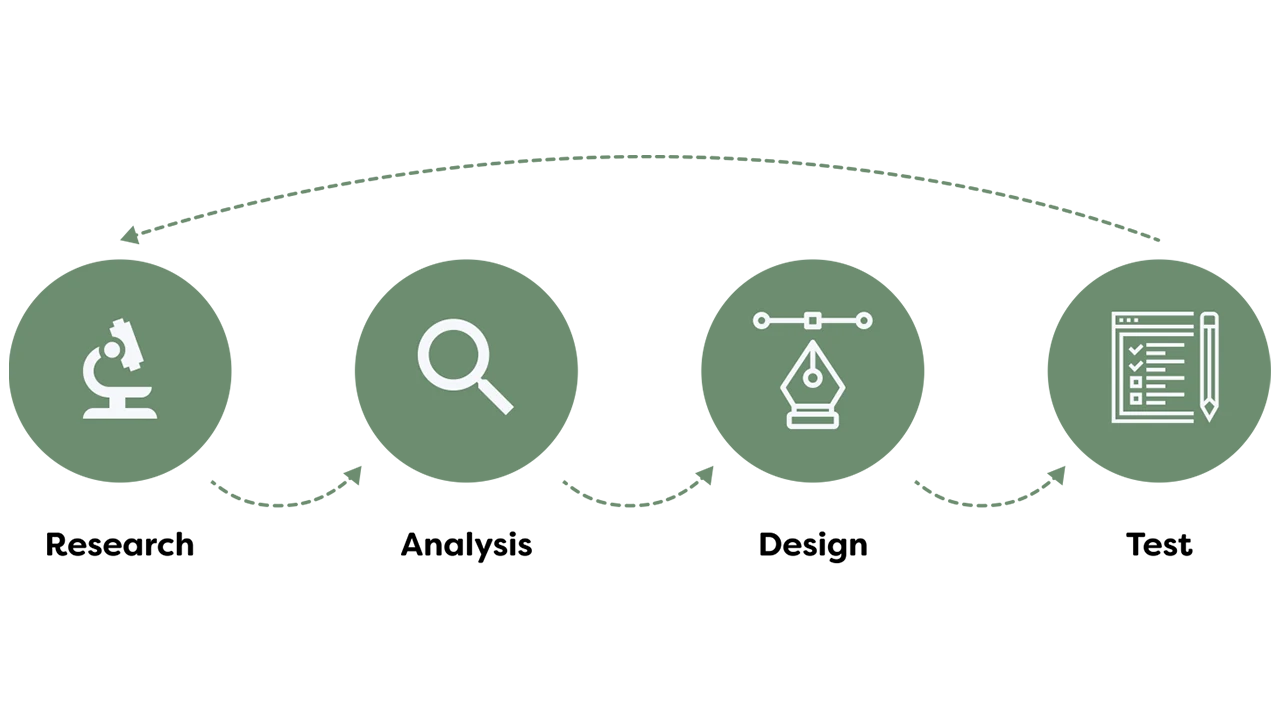
We started our project with honing in on what our problem statement is. Our guiding problem statement was how might we bring about an innovative, positive, and effortless experience with plant care? We approached this project through a user-centric design thinking process where our team focused heavily on emphasizing with our users (plant owners) and user research to drive our design decisions. What we wanted to discover included ways to create a convenient method for plant owners to care for their plants while receiving accurate information and task management tools to keep track of their plants’ health and happiness over time. As a team, we wanted to step outside of our comfort zone and explore new and immersive technologies/experiences which led us to identifying opportunities in the Internet of Things (IOT) market. The end goal was to truly provide engagement, involvement, and connection with our multimedia solution.
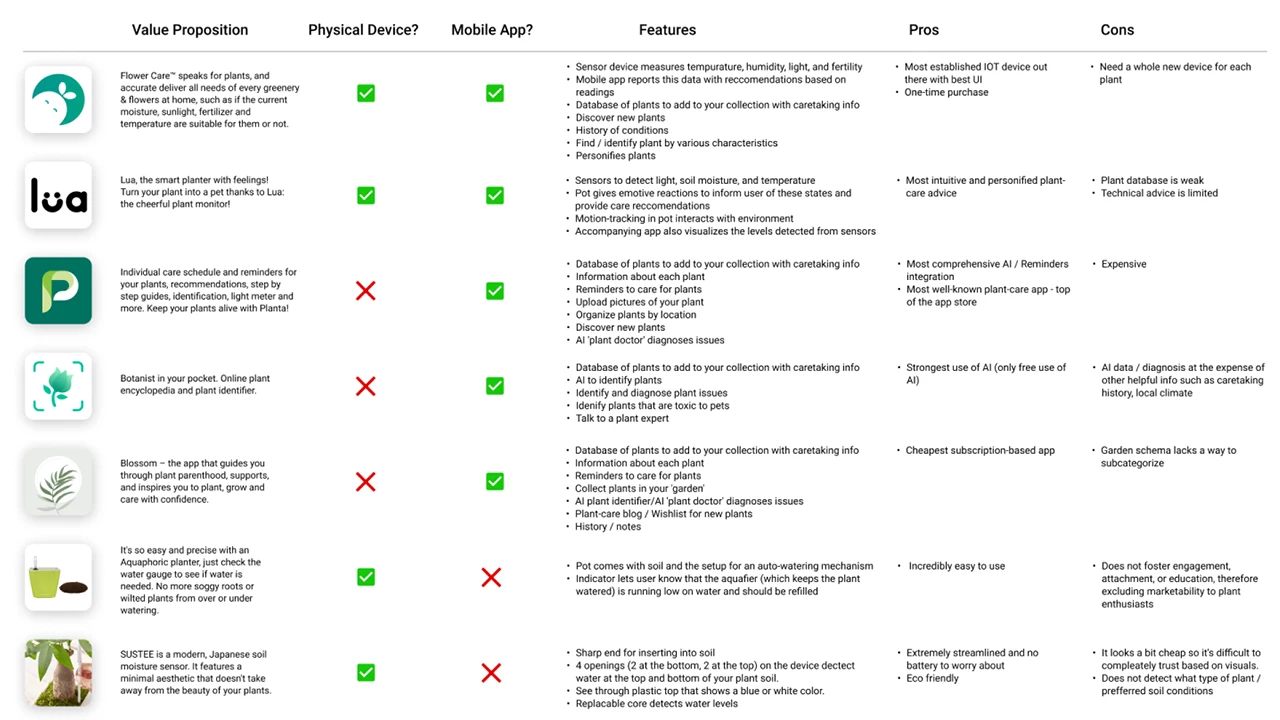
Prior to doing our primary research, we did a few preliminary steps to analyze the current market trends. Since this space of plant care tracking and reminders are saturated, our team wanted to explore what was currently successful, could be improved, and how our product could stand out from the rest in the existing market. With that, we performed a competitive analysis to evaluate the strengths and weaknesses of our competitors.
Once we finished with our competitive analysis, we pushed to create a matrix to prioritize features and develop an early product roadmap so that the design and development teams can discuss levels of feasibility and set realistic deadlines to meet.
Our goal for research was to ensure that we would make data-driven design decisions throughout our entire process. The goal was to put ourselves in the users’ shoes and understand their pain points as well as be able to defend our design solutions using the research and data we accumulated over the first phase of this project.
For our research, it consisted of first understanding who the users were through stakeholder interviews, contextual inquiries, guerilla interviews, and screener surveys. We understood we had a large demographic so we needed to cater to a specific group and get a better understanding of the problem. Our users for this project were targeted to beginner and intermediate level plant owners who are technologically driven and enabled.
Even though we spent over 10+ hours listening to users speak about their plant care journey, we had still set out to launch a quantitative survey through Qualtrics to quickly gain data to understand the context, motivation, and cause of certain elements within plant care ownership. It allowed us to generate a large enough sample of respondents to truly be representative of our target demographic. The goal was to understand plant owners’ experiences and relationships with houseplants. We were able to branch questions based on key differential factors such as how many plants the respondent currently owned and how they rated their expertise. We focused on finding online forums and groups of plant owners and enthusiasts, as well as those that focused on college students local to Philadelphia. Our survey gained a total momentum of 302 respondents, over half of which responded ‘yes’ to conducting further research.
Our team conducted approximately eight user interviews. The goal of these interviews was to explore people’s experiences and relationships with plant care. We interviewed plant owners who considered themselves to have beginner or intermediate plant care expertise. We transcribed all eight interviews and created a word cloud to visualize common themes, and also generated a list of the ten most frequent words.
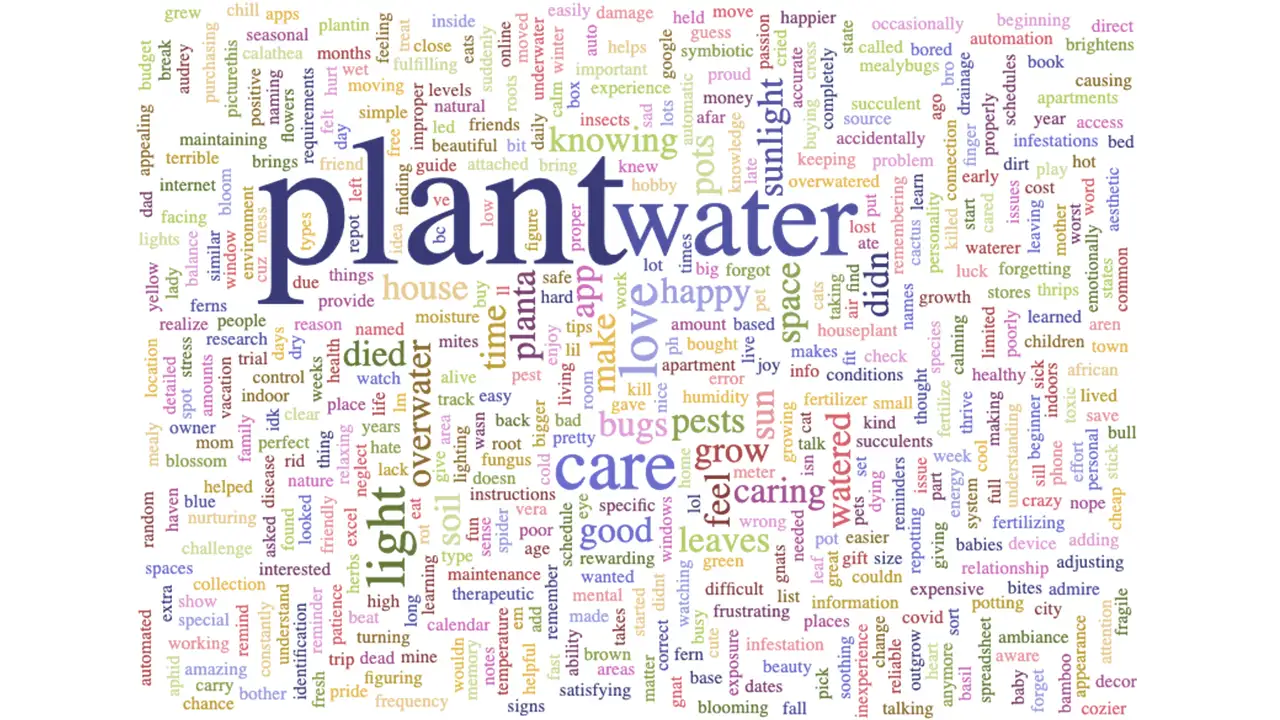
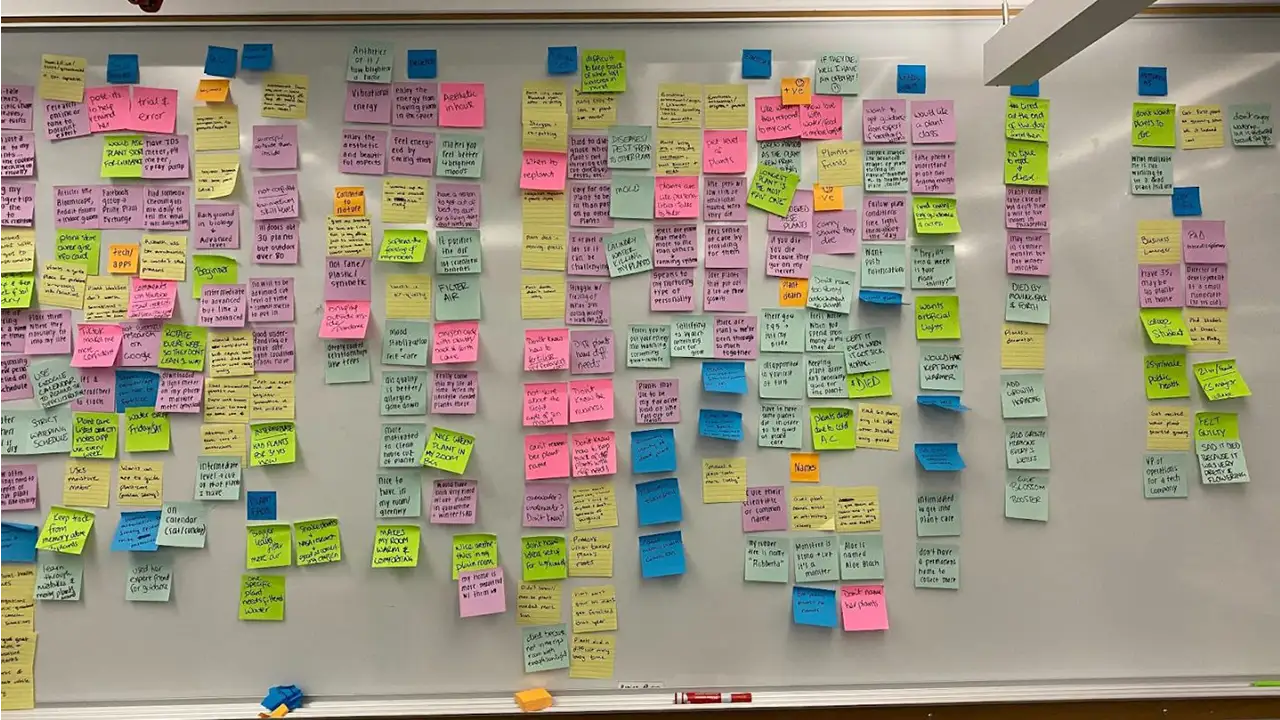
One interesting insight from this exercise was that water was the second most common word, whereas other variables that our sensor detects, such as humidity and temperature, were not as common. Another key insight was the overall sentiment of many of the top words such as care, feel, home, good, and pretty have a positive, nurturing connotation. We also got together and coded each interview, creating an affinity map from our insights.
Overall, most of the people we interviewed were busy working professionals with a lot on their plates and a need for convenience. We learned about a variety of different routines and methods for plant care, and a trend that stuck out was people with a higher skill level and more expertise were more resistant to the idea of using a system that would require them to water their plants or do other tasks on a strict schedule; they had a feel for what each unique plant needs, and as a result their schedules were looser and more intuitive.
People also used a variety of resources for advice and help, but a common complaint was the lack of a unified source for this information. We see this as an area of opportunity for our app.
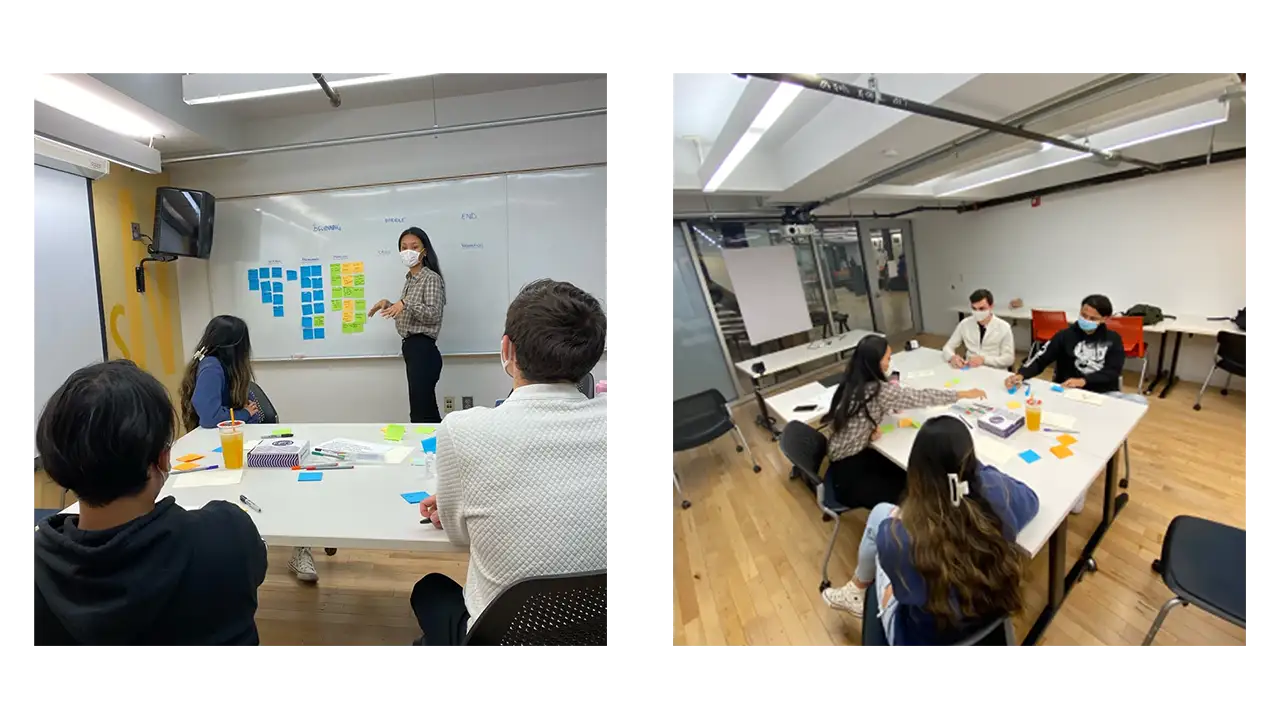
We brought our target users in. Once we have gathered an intensive amount of rich user data, we felt confident enough to start the ideation stage. But even for the ideation stage, we started with involving the user first in a participatory design workshop. We conducted this session by uniting users together and working as a team to generate ideas for a user scenario and learn the underlying needs and motive for each idea. It was a great hour and a half long session where we got a lot of insight into who the potential user of this app would be, what issues would arise, and what sort of solutional ideas would be helpful to combat those issues.
Our major takeaways and recommendations included:
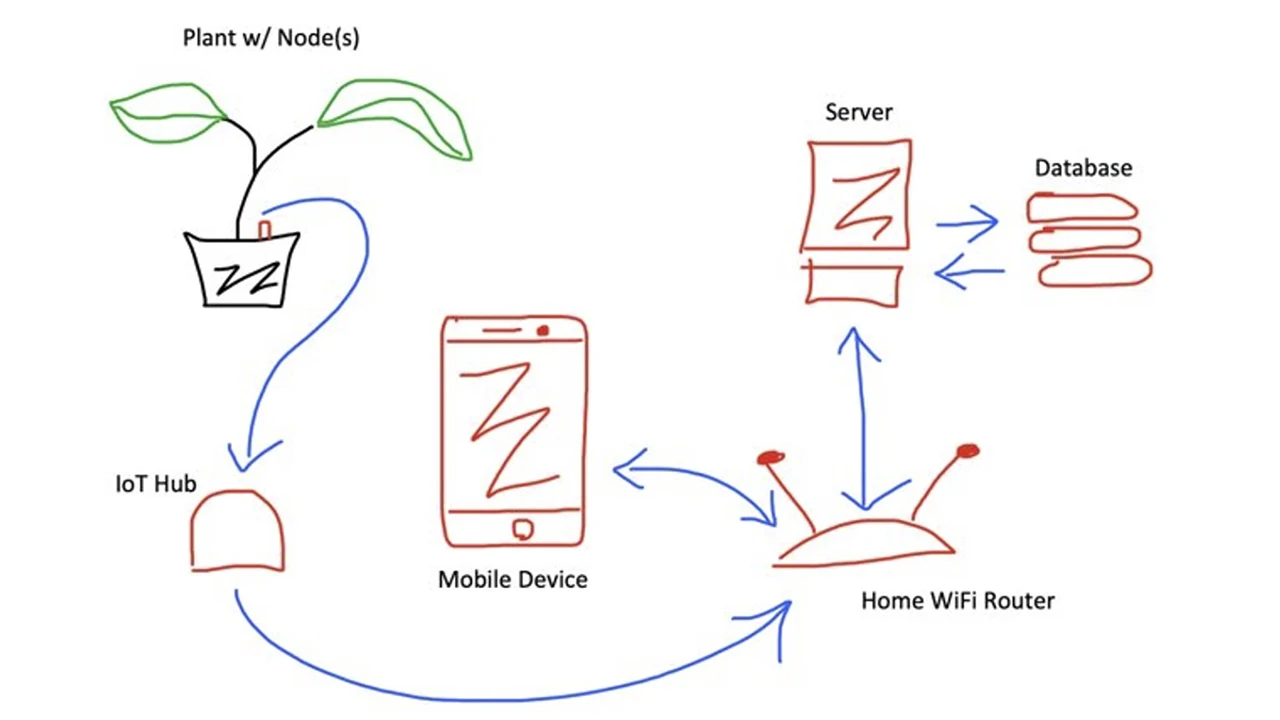
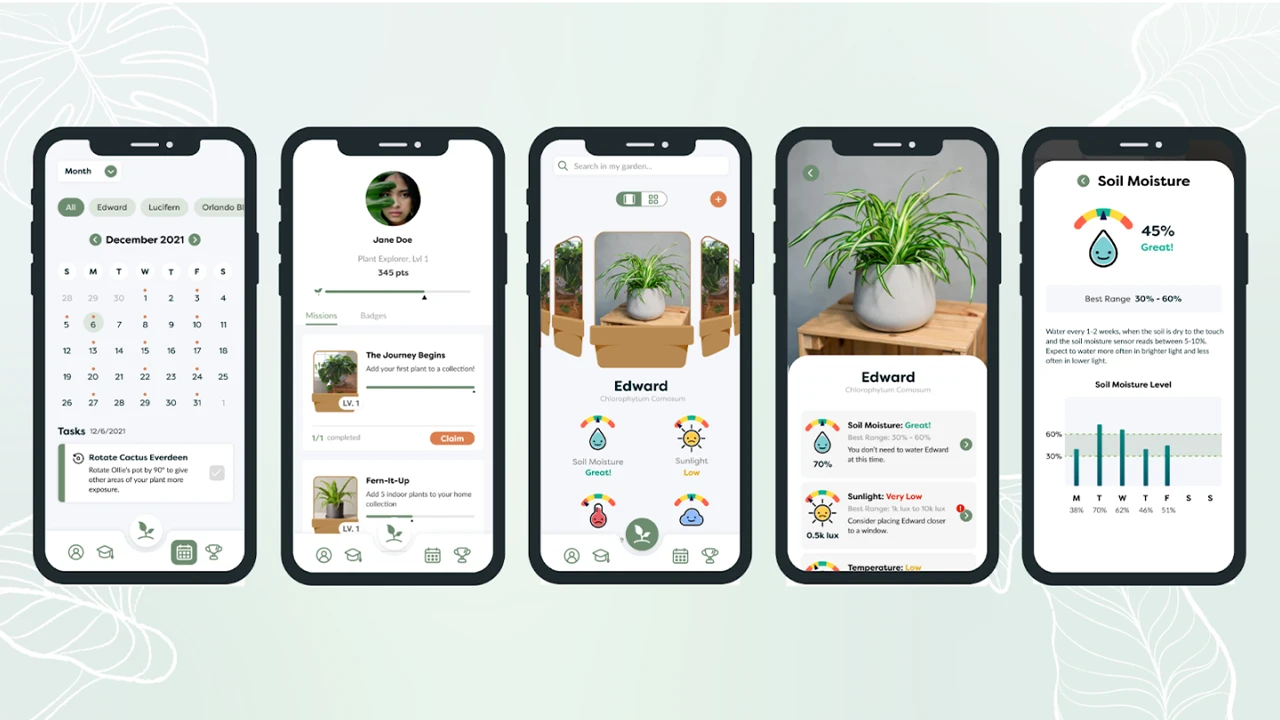
Through our research, our solution is an app that provides care recommendations about your plants and is paired with a sensor that detects soil moisture, sunlight, temperature, and humidity.
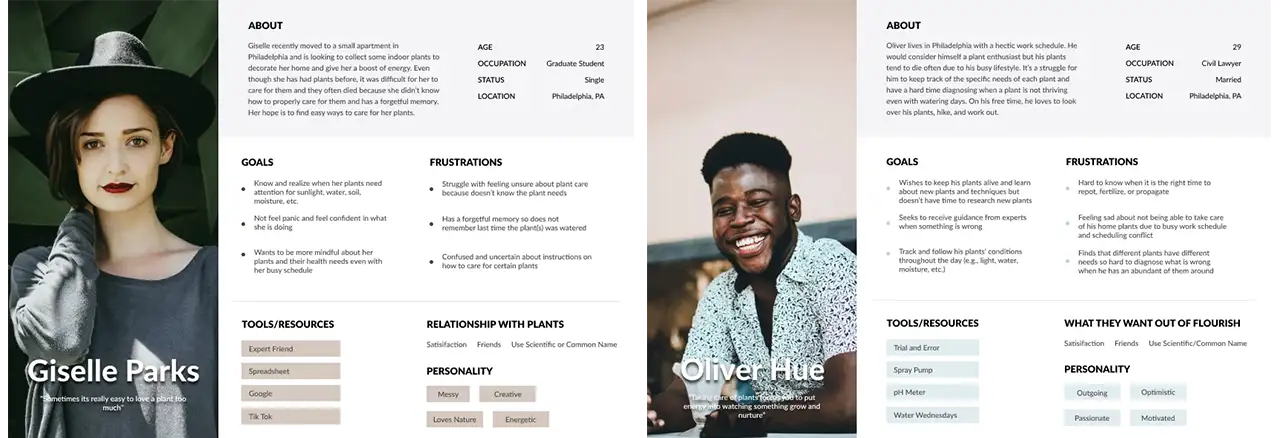
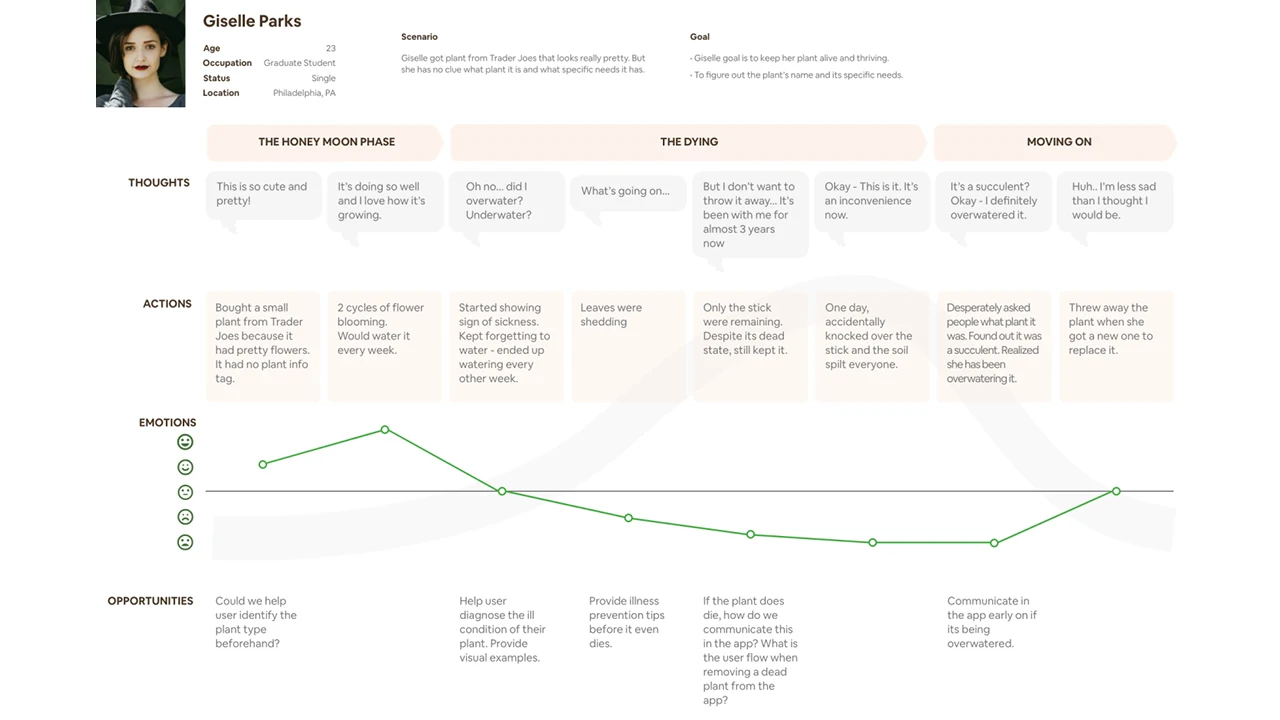
Based on these findings, we created user personas to help guide our design process. We realized from our research that we should primarily target plant owners with beginner or intermediate knowledge levels, as they were the groups that needed the highest levels of support. We created user personas and journey maps of this target audience.
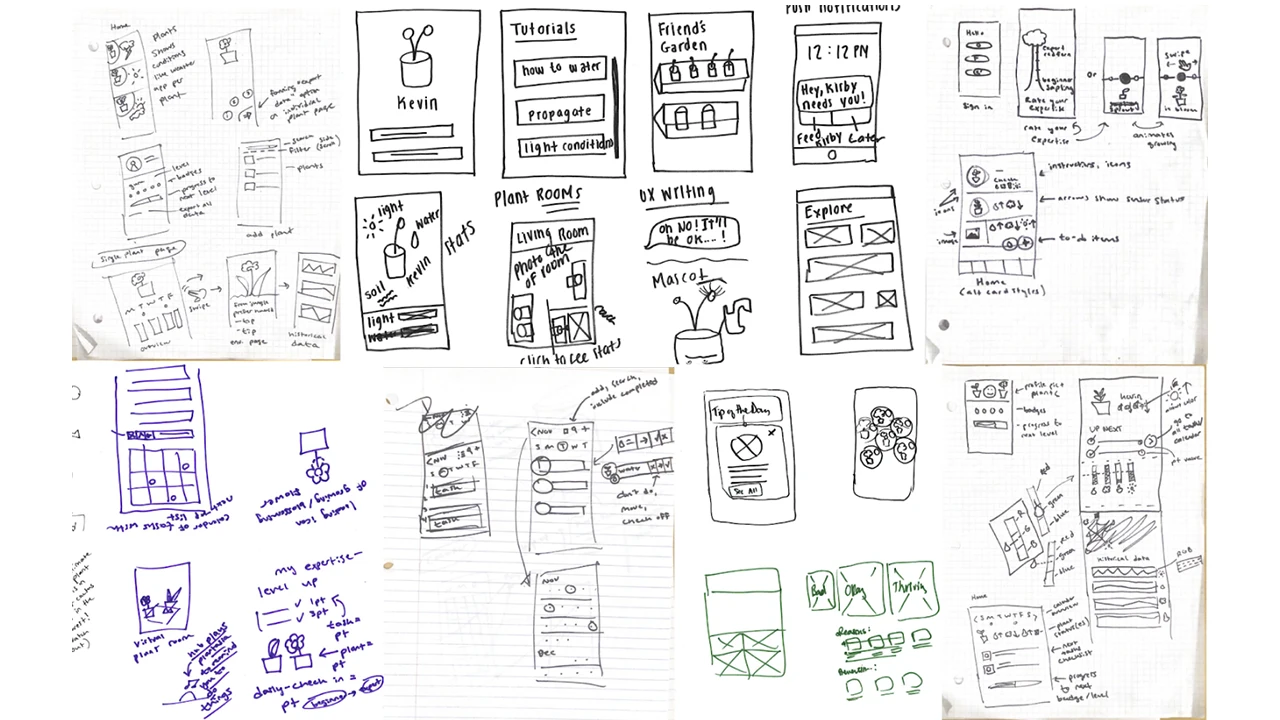
We started the design process by sketching our ideas for the sensor and app in order to quickly communicate our ideas.
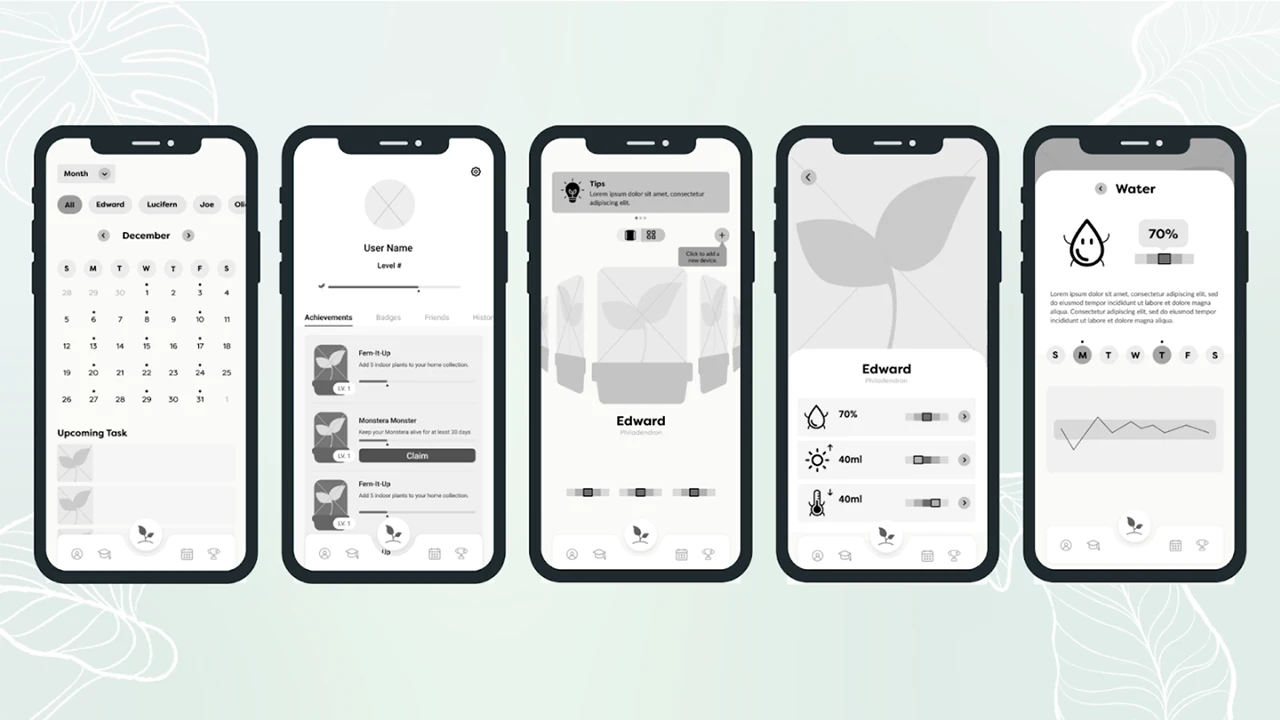
Next, we moved on to a clickable grayscale prototype for our low-fidelity prototype. We avoided adding color at this phase to keep the focus of our testing on the basic structure of the app.
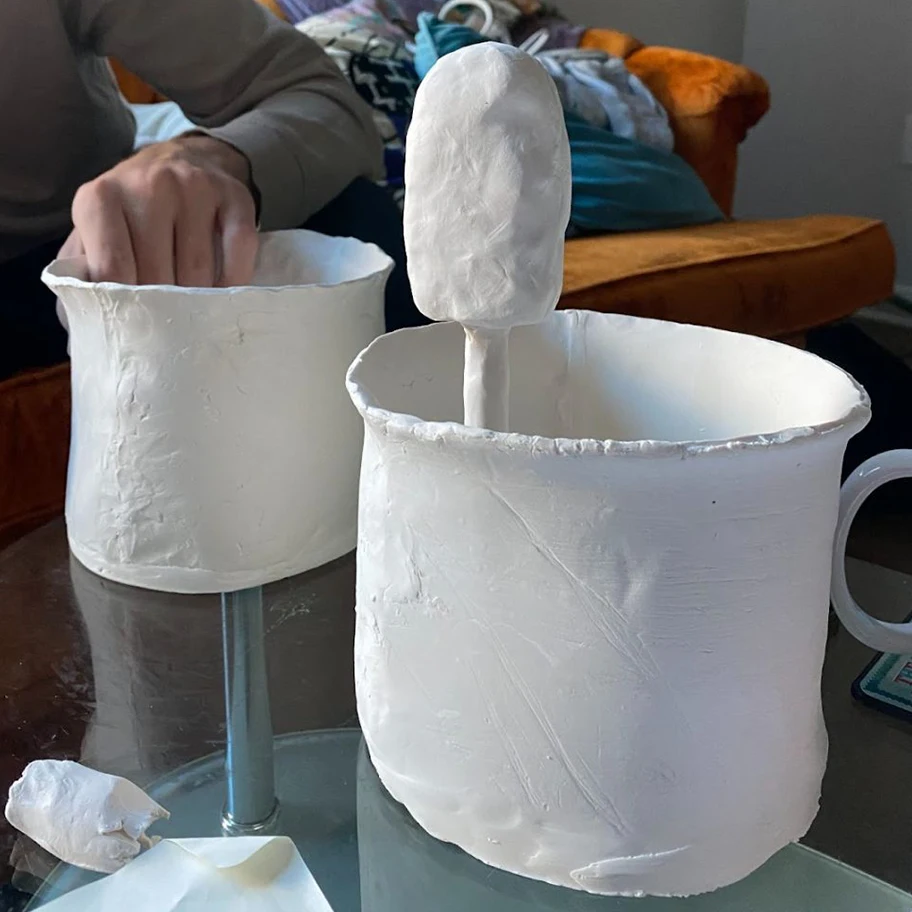
We also created clay prototypes of sensor devices to test various ideas with members of our target demographic, as well as conducting focus groups to understand what product features they would prefer to see.
After testing our low-fidelity app design with users, we made revisions based off of their feedback. We also added color, text, and real images so that we could begin to test the content of the app as well.
Based on user feedback, we also narrowed our sensor ideas down to devices that could be stuck into a pot. We designed various iterations of the sensor based on the needs of users, such as being small in size and not taking away from the appearance of the plant.
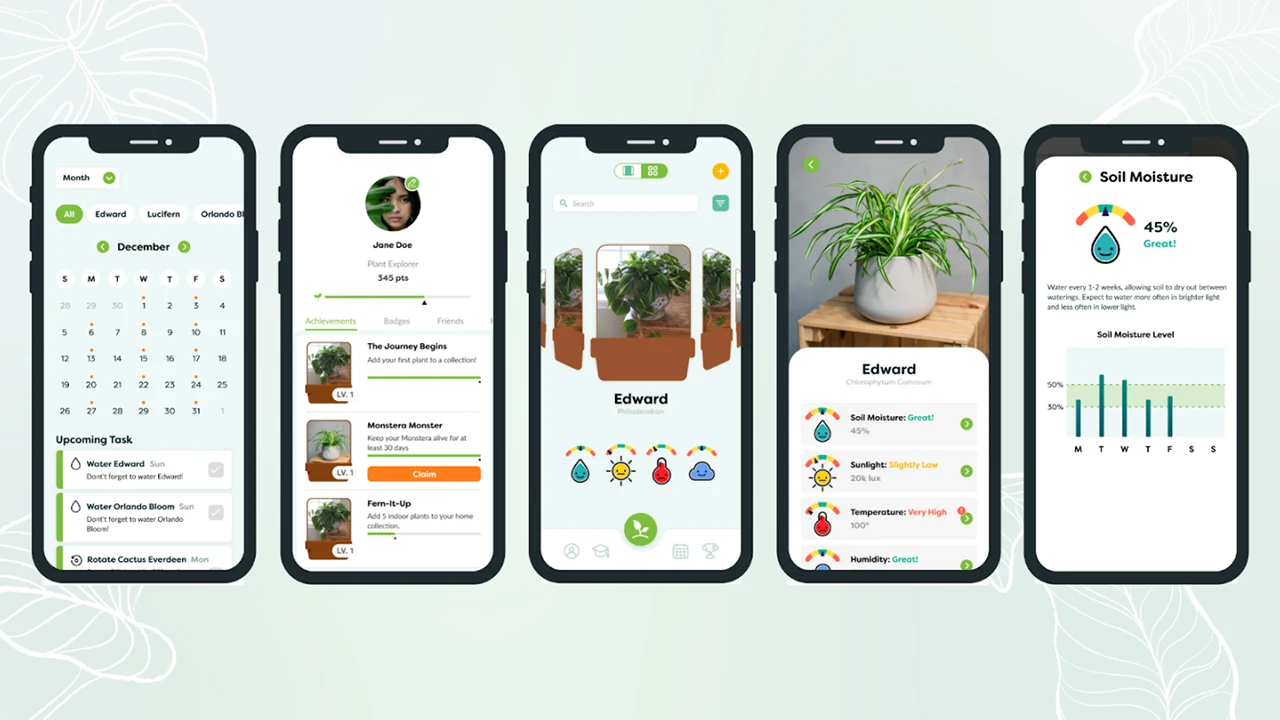
After further testing, we created our high-fidelity prototype.
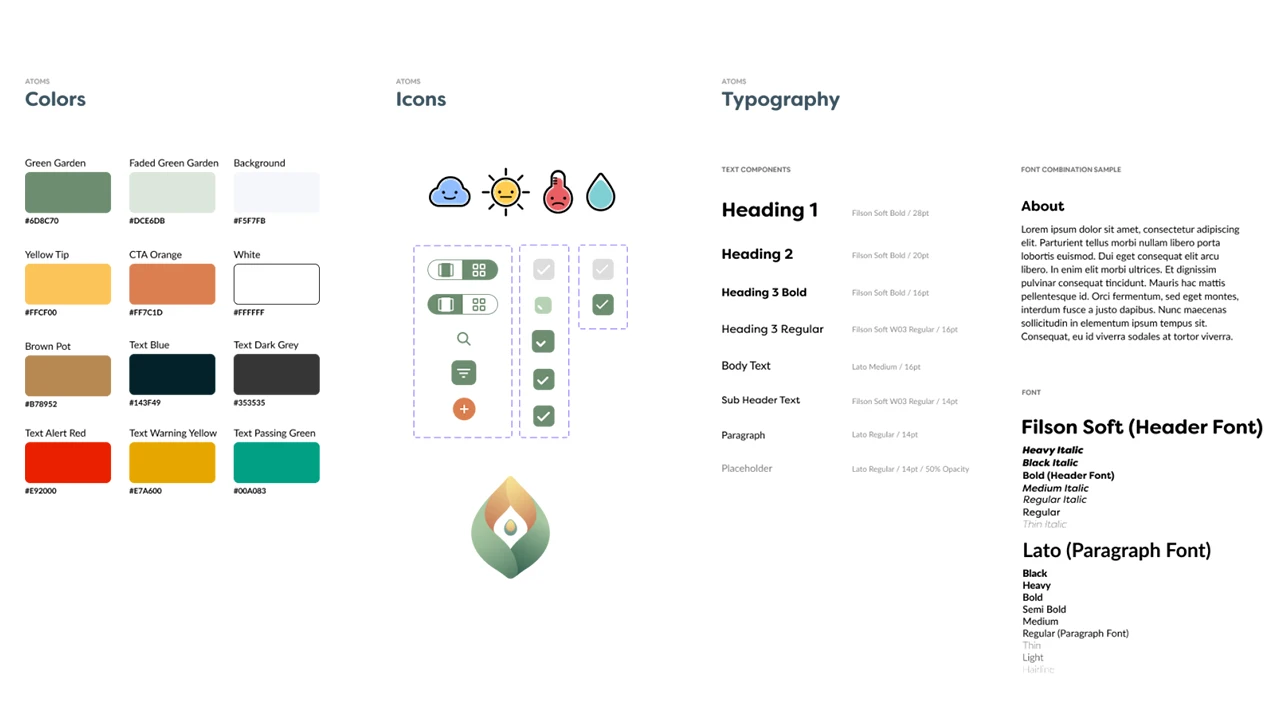
At this point, our style guide was fully finalized. We used the atomic method to create a modular and consistent design system that made development easier.
To fully bring the app to life, we also designed and implemented microinteractions for the interface.
A central theme of our app throughout all iterations was personifying plants to create a greater sense of emotional connection. With this in mind, we animated transitions for the icons that delivered information about how each plant was doing.
We also added an animation for the bluetooth connection loading while users connected the sensor to the app. This feedback was intended to mitigate user frustration while waiting for the process to be completed.
Finally, we created a confetti animation for users who won badges to add more cheer to the experience.
Our final solution was a high-fidelity prototype and IOT device design concept.
App Development was done in an Agile method with UX. We started with the core functionality we knew we would always need and could be styled and made pretty later on. With each design phase or ‘fidelity’ provided by our UI designers, more features were added into the app, tested, and improved in further fidelity. That was the development cycle for 9 months.
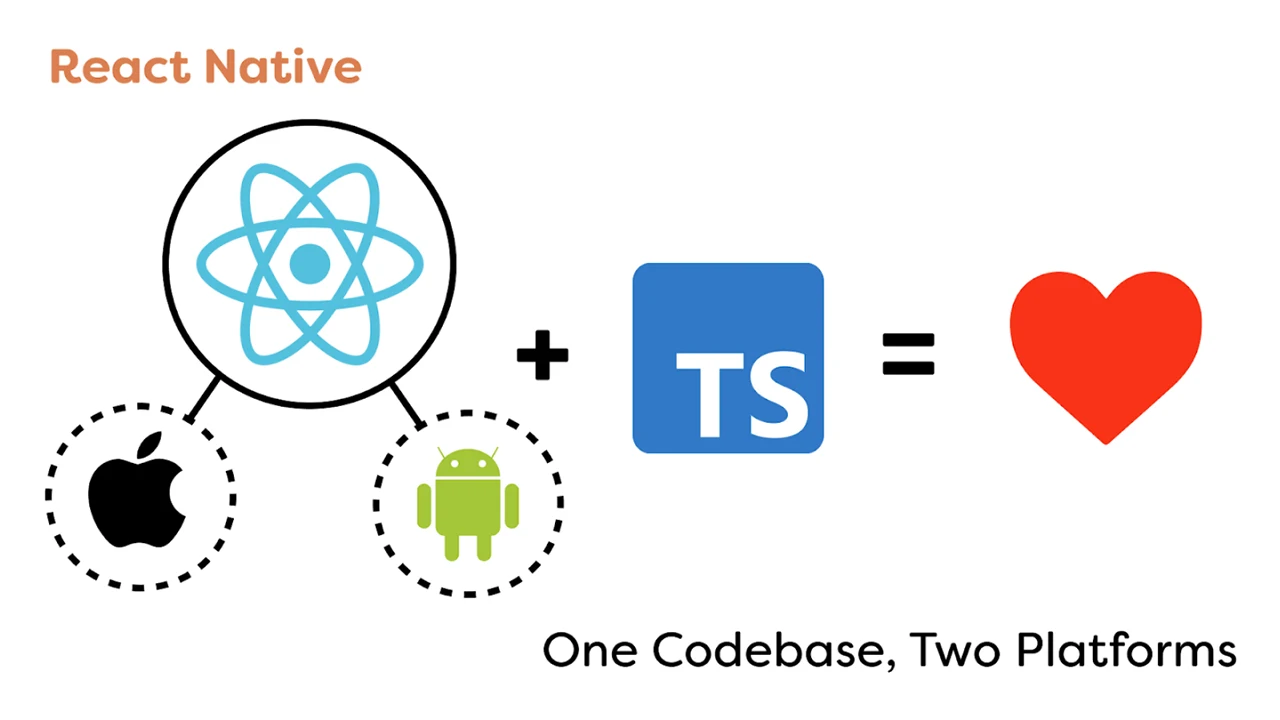
To make the app, we went with React Native, a framework that allows us to code for both iOS and Android and only need to maintain one code base. It also includes many handy built-in functionalities that minimized development time.
Since there was only one dedicated app developer who was proficient in JavaScript, we decided to code the app in Typescript which is a very strict version of JavaScript, acting as a second eye while coding, pointing out technical flaws and anti-patterns, solving bugs before they even existed.
Prior to this project, our goal was to collaborate on an interdisciplinary team, using technology to solve people’s plant-care problems.
Our final design was navigable by 100% of users it was tested with, and the majority of users reported that they would like to use the product if it were to go into production. This project will be continued next year by another team at Drexel, and we are excited to see what else will be achieved!